Quieting Your Space to Prepare for Montessori
Whether you are planning to homeschool or just want to apply Montessori principles at home, it is easiest to start with a blank space–or at least a minimized space. Take it one room at a time.
“When you quiet a space, something magical happens. “
Myquillyn Smith, “The Nester”
Let’s start with the child’s room (or your room if your little still rooms in or co-sleeps!). Take a moment to just sit in the space in silence. How does the room feel to you? Is it peaceful? Calm? Or chaotic? Write down how you feel. Odds are, your child feels the same way in that space.
Next, remove excess (consider completely quieting the space by removing everything). I LOVE the book “Simplicity Parenting” to help with this. It is inline with the Montessori Method and makes it so much easier to get through this step! You will reference this for YEARS! We are going to get rid of all toys that are:
- Broken
- Developmentally inappropriate (you can set aside for later if you wish!)
- Fixed
- Do too much/highly stimulating
- Annoying or offensive
- Inspires corrosive play
- Multiples
Next, let’s consider what can be left out, how many are out at once, and what how to display them. First, let’s consider what can be left out. In our home we consider favorites and toys/materials that encourage open ended play. We want the children to create and drive their own play instead of the toy. We are designed to work and create not to be entertained (although this can be fun in moderation!). Everything that does not fit in with the above must go, be put up for later, or can be removed from the shelf and be brought out when asked for.
Now the question is, how much should be out at once? In a bedroom for under 3, I recommend limiting to 4-6 items (at least initially). Consider the use of this space. The room is for rest and preparing for day/night. The focus is not work but rest. Once you have picked the toys/materials that will remain out, observe your child and see how they do. They may need less depending on what their response is. Are they playing with the items or just pulling everything out? If they are doing the later, typically the environment is overstimulating to them or the presentation of the toy/material needs to be shifted.
Now, let’s talk about how to present a toy/material on the shelf (instead of a bin or toy box!) so that the child is enticed to play/work with the toy/material. The goal here is not simply to make everything neat and organized but for the everything to have a clear home AND attract the child to use the toy/material on their own. Ask yourself, is the child is able to remove the item and return it when they want? Trays often make this easier (especially for items that have multiple pieces!).
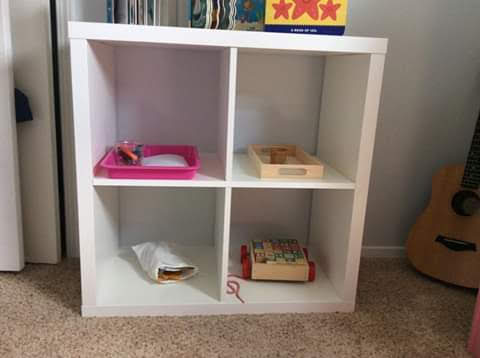
When we present a work/toy, we want to present it “undone”. So if we are presenting a puzzle for example (especially to a Montessori little!) we want to have it undone. The idea is to encourage them to complete the work by it’s presentation. If it is already done, we are encouraging them to dump the work. Consider the best way to present each of the 4-6 items on a shelf in their room. This is the shelf we have for our girls room. It started out as my oldest’s toddler shelf but is now a shelf for both girls to have a few items in their room.
Now that we have quieted the space, removed the excess, gone through and sorted the existing toys, AND we have shifted how the toys are presented/stored then we are ready to pause. Pause to observe. Watch how your child engages with the new set up. Do they play? Dump? Create? Are they able to easily retrieve and return their toys/materials to the shelf? Are the trays easy to carry? Give it a few days of observation. Then adjust. After you have gotten this space to a good place, leave it this way and rotate out toys/materials that are not played with every 2-4 weeks. Repeat this process for their main play/work space. This could be a playroom or a family room depending on your home set up. You do the same process as above!
“Help me do it myself.”
Once this is complete, now consider the space from your child’s perspective. Is it accessible? Can they reach/access items they need access to? Are you constantly having to get things for them or do things for them in the space that they can do for themselves? Ask yourself, how can I help my child to do it themselves? Do you need to add a stool to your home? Or a child sized chair to sit in? These are just examples. Take some time to work through this for your space and child.
You also will need to consider their closet. Is it accessible? Is there too much? Is everything out seasonally appropriate? Can this be rotated in your space? Consider these questions for their dresser and wardrobe as well.
But what about spaces without toys/materials? How do you quiet those spaces? We begin at the same place. Sit in the space and note how you feel. Write it down. Then, remove excess. Consider removing everything. Once this is done, bring in what is needed. Next, consider how to make it aesthetically appealing (but not overwhelming). You want to think about it like you are staging it. Everything needs a purposeful or beautiful home. It should be aesthetically appealing to you and useful. After this is complete, work through the rest of the steps above (toy/materials displayed and independent access as reasonable/necessary).
I find that I need to repeat this process periodically as I observe my child in the space or after a vacation or holiday (especially one involving gifts!)
Have you ever quietened your space? This is just a starting point to help you begin your own process. Hope you find this helpful!
XOXO,
Amanda